We know that HTC is trying to push their devices towards the consumers out of the crowd. Well, it looks impossible for HTC now. The company which was a premium at a time is now lacking those skills. This year, their latest addition to the “U” lineup was the U12 Plus. Launched a few weeks ago, it is one of the greatest devices from HTC till now. There’s not a lot added to it as new but it still something we can consider while looking for flagships.
Apart from that, the developing side from the HTC is cold too. The official TWRP isn’t even out yet while others are receiving very early right after the launch. But some developers still found a workaround to root the device without the need of TWRP. There’s also an unofficial version of the TWRP available which was made by an XDA developer Freak07. So in this guide, we’ll let you know how to root your HTC U12 Plus without TWRP.

Before we get into the process, let’s check the specs of HTC U12 Plus once. Yes, the HTC U12 Plus doesn’t have a notch display. A 6-inches display with a resolution of 1440 x 2880 pixels is a great addition. It runs on Android Oreo 8.0 with HTC Sense UI on top of it. The Snapdragon 845 octa-core chipset coupled with Adreno 630 GPU and 6 GB of RAM is great to have. With 64 and 128 GB as memory options, we get to see microSD expansion up to 512 GB. The latest of 2018 till now was right here in this smartphone at no doubt.
NOTE:
If you root your HTC U12 Plus, it will lead to the voiding of your warranty. If you don’t do the process in the right way or if anything wrong happens, then you might even end up having your device bricked. Also if you think you did them correctly, there’s a little bit of chance that things might go in the wrong way. Before proceeding, make sure you that you know the consequences. The Leaker is not responsible for any bricked devices or any other results.
Pre-Requisites
- Your bootloader should be unlocked before you proceed.
To unlock the bootloader, you need to sign into HTCDev website with your HTC ID. Move on to the Bootloader Unlock Page. Now select All Other Supported Models from the drop-down menu to the right and choose�”Begin�Unlock Bootloader.” Follow the given on-screen instructions and proceed further. - You’ll need a PC to make the ADB stuff work. Make sure that you download the appropriate drivers from the download section given below.
- Make sure that you have at least 70-80% charge left on your phone.
- Enable USB Debugging on your phone.
You can get this done by going into your phone’s Settings > About Phone > Tap on Build number 7 times, if prompted, enter the PIN or Pattern to enable the Developer Options.
Downloads
Boot Images (Choose the correct one according to your firmware version)
1.15.401.4
1.15.709.6
1.15.617.3
How To Root HTC U12 Plus Without TWRP
- Download the Boot Image file and extract it. You’ll find�boot_signed.img once extraction is done. Move it to your phone’s internal storage.
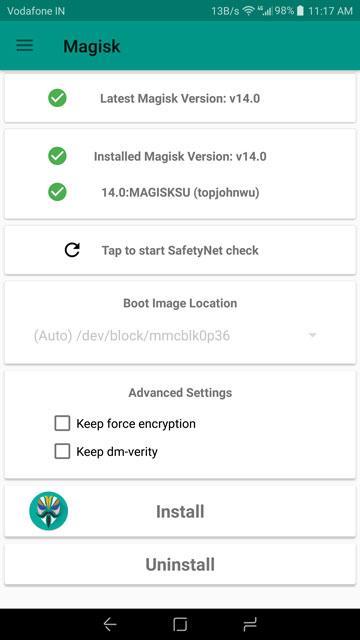
- Download the Magisk Manager APK and install it on your device.
- Open the Magisk Manager app when the installation is over. Tap Install on the main screen.
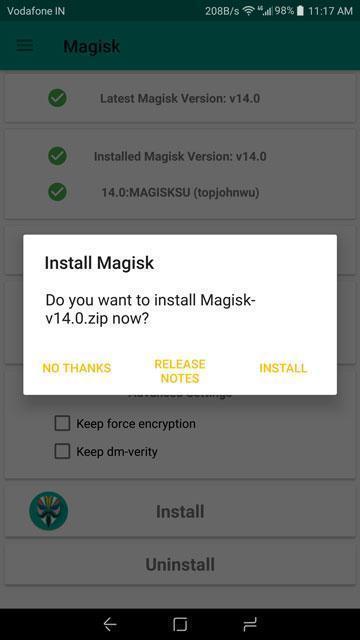
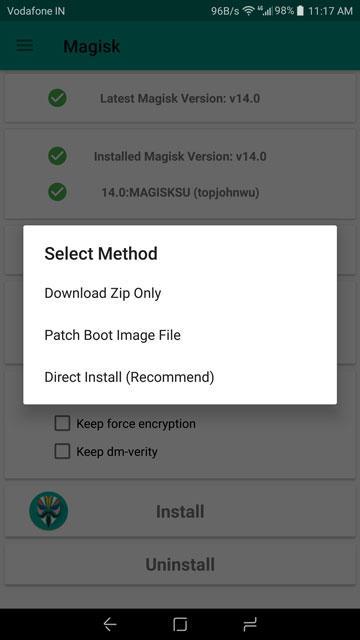
- Select Install�again on the pop-up when it appears. Now choose Patch Boot Image File.

- Proceed to the folder where you placed the boot_signed.img file and pick it. It will take some time to patch the boot image, so make sure you wait patiently until over.
- Go to your PC and connect your phone to the USB and head over to�C:/Android/platform-tools folder.
- Hold Shift and right-click inside the platform-tools folder and select�”Open Command Prompt window here” or “Open PowerShell window here.”
- Once opened, type the following command.
adb pull /sdcard/MagiskManager/patched_boot.img - Now type the given command below to reboot your phone.
adb reboot bootloader - Once your phone is turned on, check which bootloader slot is active. If a�is active, type the given command
fastboot flash boot_a patched_boot.img
If b is active, then type
fastboot flash boot_b patched_boot.img - Once the flashing is completed, just type this command to reboot your phone simply.
fastboot reboot
Once this is done, you’ll be able to use the full potential of an Android device because you just got the necessary root access required for it.