
Download the official Platform-Tools package from Google, not a third-party mirror. Get it from developer.android.com’s Platform-Tools page, extract the ZIP somewhere permanent like C:\platform-tools, then turn on Developer options and USB debugging on the phone (Settings, About phone, tap Build number seven times). Connect the phone with a real data cable, open a terminal in that folder, and run adb devices. Accept the USB debugging prompt on the phone’s screen, and it should list with a serial number instead of “unauthorized.” Fastboot needs the phone rebooted into bootloader mode first, and on some Windows machines it needs a separate driver before fastboot devices sees anything.
What ADB and Fastboot actually do
They are not the same tool. ADB, short for Android Debug Bridge, talks to a fully booted phone, letting you install or remove apps from a terminal, pull and push files, read the system log, and record the screen. Fastboot only works while the phone sits in its bootloader, a separate low-level mode used for unlocking the bootloader and flashing partitions.
Most phones ship with the bootloader locked, and unlocking it wipes the device immediately. Every guide on this site that mentions sideloading or unlocking a phone assumes ADB and Fastboot are already working, so this is that setup, done properly, on current Windows.
Step 1: turn on Developer options and USB debugging
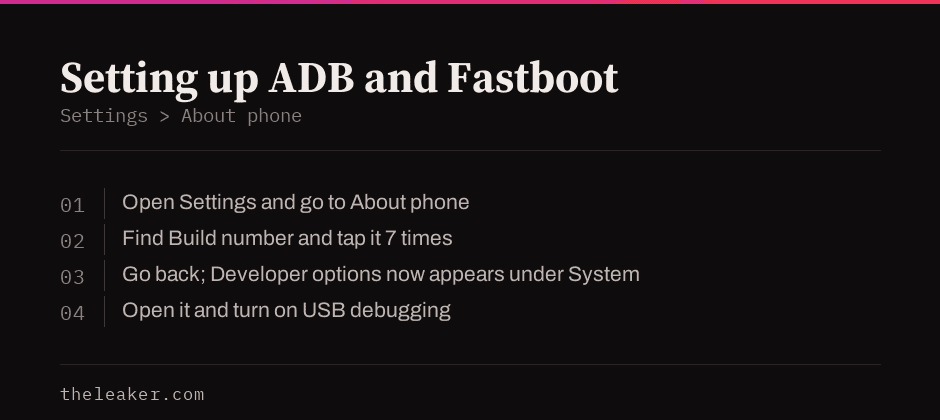
- Open Settings and go to About phone.
- Find Build number and tap it seven times. A toast counts down and confirms “You are now a developer.”
- Go back to the main Settings screen. A new Developer options entry appears, usually under System.
- Open it and turn on USB debugging.
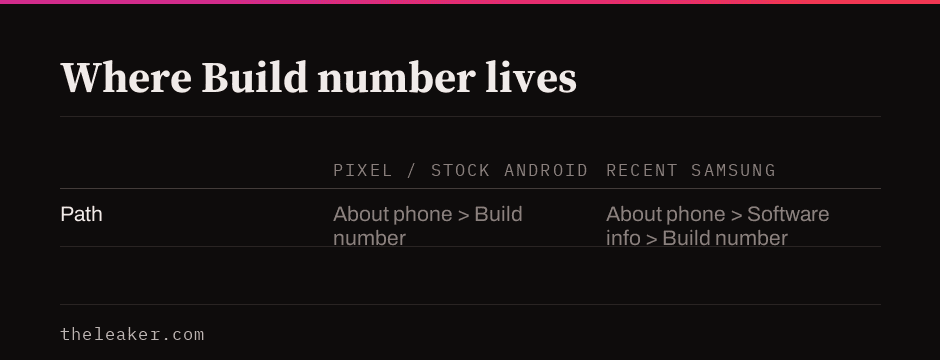
The exact path varies slightly by manufacturer. On a Pixel, Build number sits directly under About phone. On recent Samsung phones it is one level deeper, under About phone, then Software information. Developer options also unlocks animation speed controls and a live CPU/memory overlay, covered in our guide to hidden Android settings, so it is worth leaving on afterward.
Step 2: download the official Platform-Tools package
Google publishes Platform-Tools directly at developer.android.com/tools/releases/platform-tools, and that page is the only source worth using. The package is a small ZIP, and the version current as I write this is 37.0.1 from July 2026; check the page itself for whatever is newest when you download, since it updates every few months. Third-party sites that repackage it as an installer are unnecessary at best and a malware vector at worst, since the official ZIP needs no installer at all.
Extract the ZIP to a folder you will not accidentally delete, such as C:\platform-tools. Inside you will find adb.exe and fastboot.exe alongside a handful of supporting DLLs. To run these commands from any folder rather than opening a terminal inside that directory every time, add it to your Windows PATH environment variable, under Settings, System, About, Advanced system settings, Environment Variables. For what the executable itself does and why Task Manager sometimes flags it, see our separate explainer on what adb.exe is.
Step 3: connect the phone and verify with ADB
- Plug the phone into the PC with a cable that actually carries data. Many cheap charging-only cables do not.
- Open Command Prompt or PowerShell inside the platform-tools folder, or anywhere if you added it to PATH.
- Run
adb devices. - Watch the phone’s screen. A dialog asking to allow USB debugging from this computer’s RSA key fingerprint should appear. Tick “Always allow from this computer” and tap Allow.
- Run
adb devicesagain. The phone should now list with a serial number rather than “unauthorized” or nothing at all.
Step 4: the Windows driver, and where Fastboot differs
Windows usually installs a generic ADB driver automatically the first time a phone connects in normal mode. Platform-Tools 37.0.1 introduced a new Windows USB backend called libadbusb, replacing the older libusb, and it has made this step noticeably more reliable than it was a few releases ago.
Fastboot mode is the exception. The phone presents itself as a different kind of USB device while sitting in its bootloader, and on some Windows machines that interface shows up in Device Manager as an unrecognized device, or as “Android Bootloader Interface” with a warning icon, rather than being picked up automatically.
If fastboot devices returns nothing while the phone’s screen confirms it is genuinely in bootloader mode:
- Open Device Manager while the phone is plugged in and in bootloader mode.
- Find the phone under “Other devices” or “Android Phone,” right-click, and choose Update driver.
- Point it at the Google USB Driver, downloadable separately from the same developer.android.com Platform-Tools page or through Android Studio’s SDK Manager under SDK Tools.
Before unlocking the bootloader: OEM unlocking and the wipe it causes
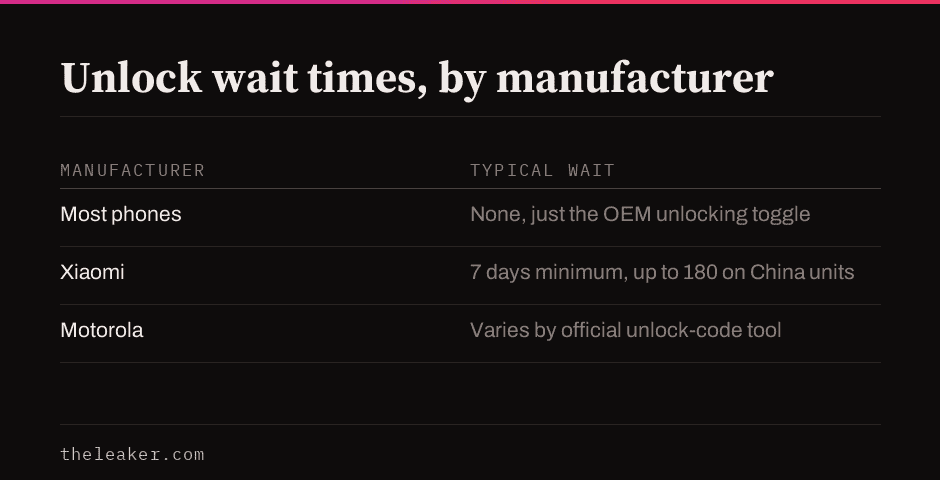
fastboot flashing unlock fails on most phones unless one extra step happens first, while the phone is still fully booted: turning on OEM unlocking in Developer options. It sits next to USB debugging and is easy to miss, and without it the fastboot command returns an error even though the phone is correctly detected.
Some manufacturers add a further layer. Xiaomi requires requesting unlock permission through its own account-linked Mi Unlock tool first, and the wait is commonly a minimum of seven days but can run longer depending on region and review queue, sometimes stretching to 180 days on China-region devices between granting permission and actually unlocking. Motorola and Xiaomi both publish official unlock tools with their own account and waiting-period requirements; see our guides to unlocking a Motorola bootloader and unlocking a Xiaomi bootloader for the current process on each.
Unlocking wipes the phone immediately, and on some manufacturers it goes further. Samsung devices trip a hardware Knox fuse the moment the bootloader unlocks, and that fuse cannot be reset by relocking, so Play Integrity checks used by banking and payment apps can fail permanently even after you relock. Pixel devices behave differently: fully reflashing the stock factory image and relocking typically restores a passing Play Integrity verdict. Treat this as manufacturer-dependent rather than assuming either outcome.
Wireless debugging, without a cable
Android 11 and newer support pairing ADB over Wi-Fi once the initial USB setup above is done. In Developer options, turn on Wireless debugging, then tap into it and choose Pair device with pairing code. It shows an IP address, port, and a six-digit code. On the PC, run adb pair ip:port using the pairing port shown, and enter the code when prompted. Then run adb connect ip:port using the separate connection port shown on the main Wireless debugging screen, which differs from the pairing port used a moment earlier. Once paired, the phone stays connected over Wi-Fi for ADB commands without a cable, though Fastboot still needs a physical USB connection since the phone has no working Wi-Fi stack while sitting in its bootloader.
Common ADB and Fastboot commands
| Command | What it does |
|---|---|
adb devices |
Lists connected phones and whether they are authorized |
adb reboot bootloader |
Reboots the phone straight into Fastboot mode |
adb install app.apk |
Installs an APK file from the PC onto the phone |
adb shell |
Opens a command line directly on the phone’s Android system |
adb logcat |
Streams the phone’s live system log, useful for diagnosing crashes |
fastboot devices |
Lists phones currently sitting in bootloader mode |
fastboot flashing unlock |
Unlocks the bootloader. Wipes the phone; one-way on many devices |
fastboot reboot |
Exits bootloader mode back to a normal boot |
Common errors and how to fix them
“‘adb’ is not recognized as an internal or external command.” You are running the command from a folder that is not the platform-tools folder, and it was never added to PATH. Either cd into the extracted folder first, or add it to PATH and open a new terminal window, since existing windows do not pick up PATH changes.
Device shows as “unauthorized.” The RSA debugging prompt was dismissed or never appeared. Run adb kill-server, unplug and replug the cable, then run adb devices again and watch the phone’s screen for the prompt.
“No devices/emulators found” in Fastboot. Almost always the Windows driver, not the cable or the phone. Follow the Device Manager steps above.
What does not work
Do not download a “Universal ADB Driver” installer from a random site. These frequently bundle unrelated software, and the official Google USB Driver linked above is the only one you need.
Do not unlock the bootloader just to try it. It wipes the phone immediately, and depending on the manufacturer it can permanently affect banking and payment app compatibility even after relocking, as covered above.
Frequently asked questions
Do I need Android Studio just to use ADB? No. Android Studio bundles Platform-Tools, but the standalone ZIP from the same developer.android.com page is the same adb.exe and fastboot.exe with none of the multi-gigabyte IDE around it.
Is ADB safe to leave installed permanently? Yes, as long as USB debugging stays off when the phone is not actively connected to a computer you trust. A phone with debugging left on can in theory be accessed by any computer it is plugged into, which is why public charging kiosks are worth avoiding with debugging enabled.
Does unlocking the bootloader void the warranty? In the US, the Magnuson-Moss Warranty Act prevents a manufacturer from voiding an entire warranty over an unrelated modification, so an unlocked bootloader alone should not void coverage for a hardware fault it did not cause. Manufacturers can still refuse warranty service for software-related faults on an unlocked device, and this protection is US-specific; other regions have their own separate consumer-protection rules.
Is there a Mac or Linux version? Yes. The same developer.android.com page offers macOS and Linux Platform-Tools builds, and the commands themselves are identical across all three. If you would rather manage the phone without the command line at all, our guide to controlling an Android phone from a PC covers the graphical alternatives.

I am the chief editor of TheLeaker. I also maintain the backend stuff of the site. I’m a tech enthusiast and loves to do Python coding in my free time. I have worked at many giant publications like XDA Developers and NXTtech before starting TheLeaker.
You can get in touch with me at Garv[at]theleaker.com.