
Xiaomi Mi A1 is the first device which was developed in joint venture with Google and Xiaomi for the revival of the Android One project, and the smartphone has been hugely successful since then. However, many Xiaomi users were used to MIUI which offers a high degree of customization and tons of features and themes. Which was missing on the Mi A1 as being an Android One device you get pure stock Android for better performance and faster updates. It was a sad trade to get faster OTA updates, as you can’t have Xiaomi’s MIUI.
But users were quick to root the device and install a custom ROM to get additional features, but then you lose the quick delivery of Official Android updates and then there’s no point of owning an Android One device. Fortunately, a talented Senior dev at XDA who goes by the name�jashancheema has figured out a way which will let you unlock your bootloader and root your phone without disabling the ability to get Official OTA updates. And this guide we’ll take a look at how to unlock the bootloader, root your Xiaomi Mi A1 and without losing OTA updates.

Before you proceed, you will need a USB-cable, a PC within which you also need to have ADB tools installed. If you haven’t installed it, here’s the link, download the ADB fastboot tools(for�Windows) and install them.
Files you Must “Download” before you proceed
or
How to Unlock Bootloader and Root Xiaomi Mi A1 without disabling OTA Updates
Step 1:� Before connecting your Mi A1 to your PC, you must first enable the USB debugging option on your device.
Step 2: To enable the USB debugging tools, just head over to Settings > About Phone > and Tap on the build number 8 times and you’ll see a toast message, prompting now you’re a developer.
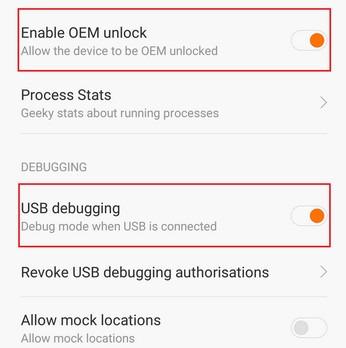
Step 3: This will enable the Developer options on your phone and now go to Settings > Developer options > and enable USB debugging option. Next, also enable the OEM�Unlocking option, also found within the developer options
Step 4:� Download�the Boot image and Extract it from the Zip file, and make sure you know the location where you extract it. It is recommended that you extract it into a sperate folder, as the path to the boot image is needed with the ADB command window
Step 5:��Connect your Mi A1 to your PC via USB Cable
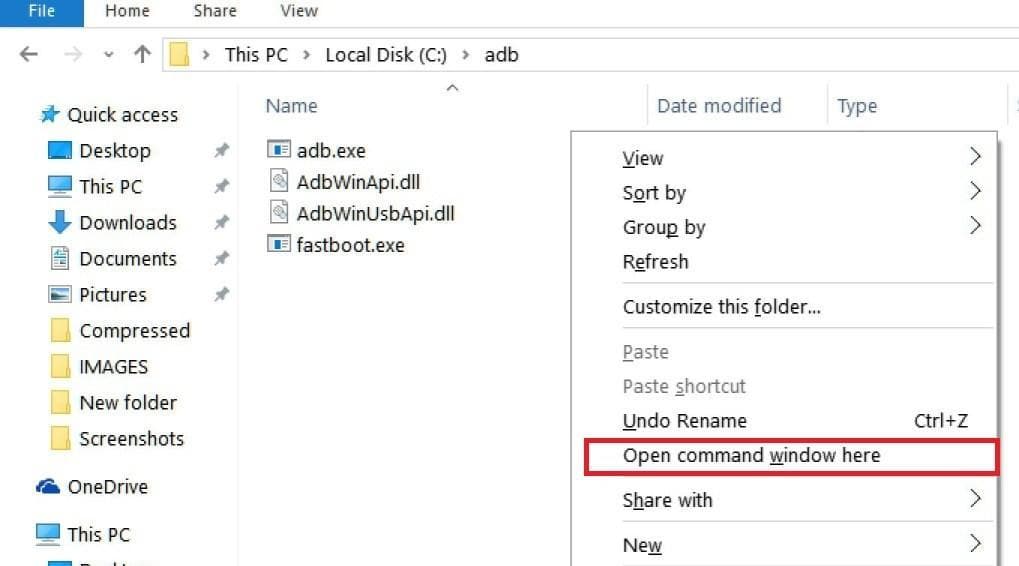
Step 6:�Open the ADB command window, to open it just go the folder where ADB fastboot tools are installed, (usually in C:/ drive)
Step 7: Once, you find the ADB folder, hold Shift + Right Mouse Click within the ADB folder a pop-up menu will appear, in the pop-up menu select Open Command Window Here.
Step 8: Now, you have to check whether your device is properly connected and detected by the fastboot tool or not. To check this just type in the Following command to verify:
==>�adb devices

If the result on your command window is a serial number, then you’re connected and ready to proceed further. Also, if you’re prompted to allow USB debugging, just Tap Ok and allow it.
Step 9:�Now, we need to reboot into the fastboot�mode, to do so, type the following command and hit enter:
==>�adb reboot bootloader
Step 10:�Once your device boots into the fastboot mode, type the following command to unlock the bootloader of the device:
==> fastboot oem unlock
Step 11:�Once done, disconnect and reboot your device, then again connect it and once again reboot into fastboot mode, by typing the command given in Step 9 above
Step 12:�Now comes the main part to boot into the downloaded Patched Boot image, to do so. First you need to get the path in which you have extracted the patched boot.img earlier. Copy that folder path in which the patched boot.img resides. (To copy the path, just go to the top of your folder’s address bar and right click on it and select copy address as text)
Step 13:�After you have copied the address where the patched boot.img belong, type the following command where it says’s Paste Your Copied path, at that place, you shall paste your copied path text.
==>�fastboot boot� Paste your Copied path here� patched_boot.img
Example (Do not copy paste the example in your command prompt):�fastboot boot C:\Program Files\extracted files patched_boot.img
Step 14:�The above step will boot your device in the patched_boot.img which allows for the OTA updates to still be captured while you’re rooted. Next, reboot and Download the Magisk Manager Apk(Given above) and install it, use Direct Install, now again reboot and you’re done.
Lastly, if you face any issues, just download telegram and join the Mi A1’s development group by clicking here. If you to want to know more about this and read other user’s response to this method, visit the original thread on XDA, here. You should be ready for some glitches here and there and should be familiar with the risks that come with rooting your device.

DO i need to BACKUP phone before doing this ?
Always make a backup before doing these things.
thanks for tutorial. successful